The Generate tab

Follow the steps in this exact order :
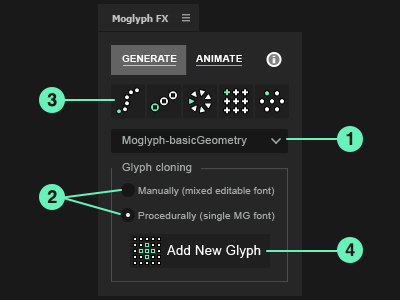
- Choose a Moglyph font (or a custom one)
This dropdown list contains all the thematic Moglyph fonts available (with 100 glyph shapes in each), and the option to use a custom font (works like Cinema4D's MoText tool in this case). More glyph fonts will come in the future, you'll find them here after a correct installation of the assets.
- Choose how the glyph cloners should be populated
Choose one of the 2 modes available : Procedural (by default), allows you to automatically generate a specific amount of glyph clones and arrange them by iteration or randomly if your have created more than 1 glyph shape ; Manual is less common, but it can be useful if you want to create manually your own "sentence" of glyphs, one by one, by picking them in the Glyph panel.
- Create a Cloner setup
Click on one of the 5 different Cloner setup buttons. From left to right :
Spline Cloner (arranges clones along a path), Linear Cloner (clones are arranged inline), Radial Cloner (clones are duplicated in a circular shape), Grid Cloner (clones in grid array) and Honeycomb Cloner (similar to the grid but with alternated odd and even amounts of clones in the rows).
- Add new glyph shapes to your cloner
By clicking this button while a cloner layer is selected, you'll open up a "Glyph panel", just like in Illustrator, that allows you to replace the default glyph shape (if you choose only one glyph), or to create iterations or random arrangements with multiple shapes.
Once you have finished your selection, just close the window (you'll be able to add more glyph later, at any moment, by re-clicking on the Add New Glyph button).
The Animate tab
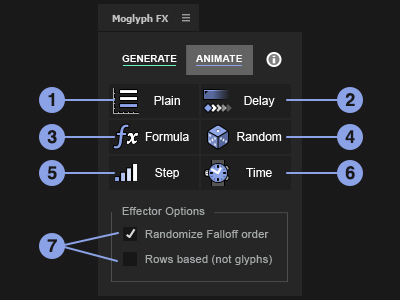
From top to bottom and left to right :
- Plain effector
Applies values uniformly, as defined in the Parameters effect's group, to all the clones or just a portion of them if you play with its Falloff ;
- Delay effector
Animates the clones sequentially from their initial state (you can invert its keyframes to reverse the animation) to some specified parameters, with a nice elastic secondary motion.
- Formula effector
Applies parameters values based on 1 of the 3 different formulas available : Wave (sin), N selection (mod) or Random direction (just set the Rotation Z to 360° and play with the N slider to set the number of orientations).
- Random effector
Animates your clones randomly, in an organic way, based on the parameters you specify. You are not bound to have some animation : just set the Animation speed if you want a still design.
- Step effector
Play with the Curve's keyframes to reshape your clones, from the first to the last, directly in the AfterEffects "Graph editor", just as you would do in Cinema4D's "Spline graph" !
- Time effector
Creates a perpetual motion onto your clones, based on the values specified in Parameters. No keyframes are needed !
- Effector options
The Randomize Falloff order gives a more chaotic Falloff (randomly chooses the next clone to animate while animating the completion slider) ; the Rows based (not glyphs) option is only useful for the Grid and the Honeycombcloners (animates line by line instead of character by character).
|
|


Post a Comment